Darkpromise set | Level 65
Lost Vale Walkthrough
This page contains a lot of spoilers, visit the official RoR Wiki page if you want to avoid them.
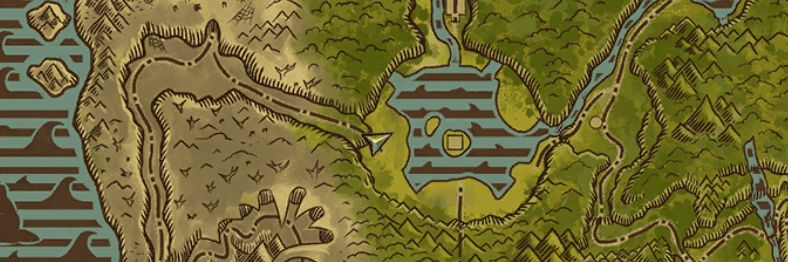
Getting there
Lost Vale Scroll
Available from the Guild Halls only if you are in a guild and that guild is level 35 or more. 1 hour cooldown not shared with other teleport items.

Walking
Unlike for Gunbad and Bastion Stairs, it is very easy to get to the Lost Vale entrance by walking and the scrolls are not really needed.
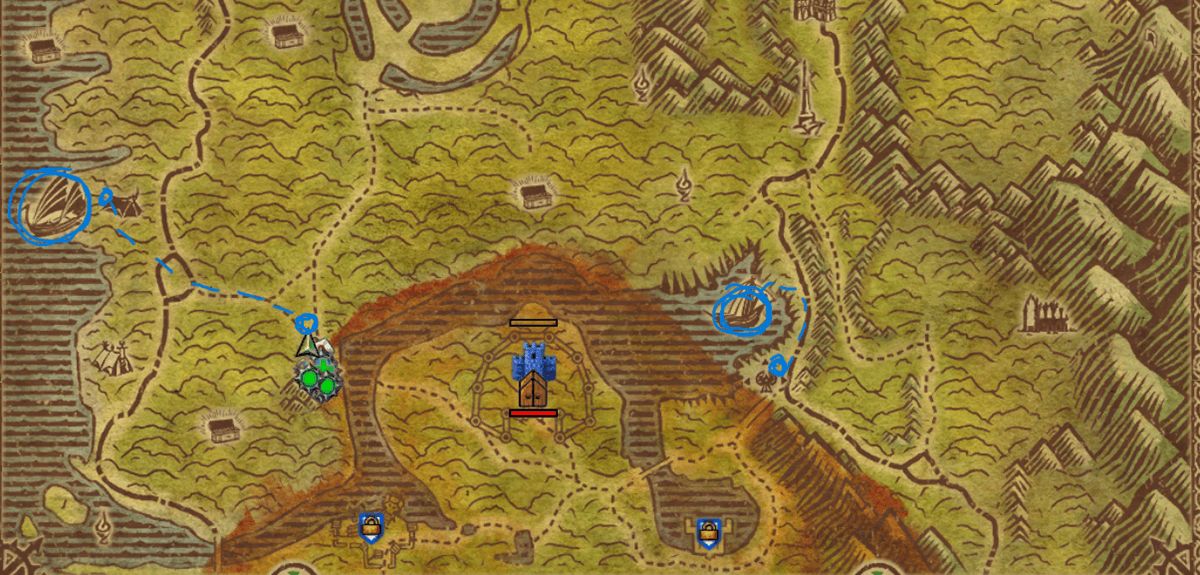
Order
Fly to Avelorn and just run north to the Lost Vale Boat just outside of the warcamp
Destro
Fly to Avelorn and run north when you land about 100ft and you will see a Jade Coast Portal. Click this to teleport to Chapter 12, then run down the hill west to the Lost Vale Boat.

SETTING UP
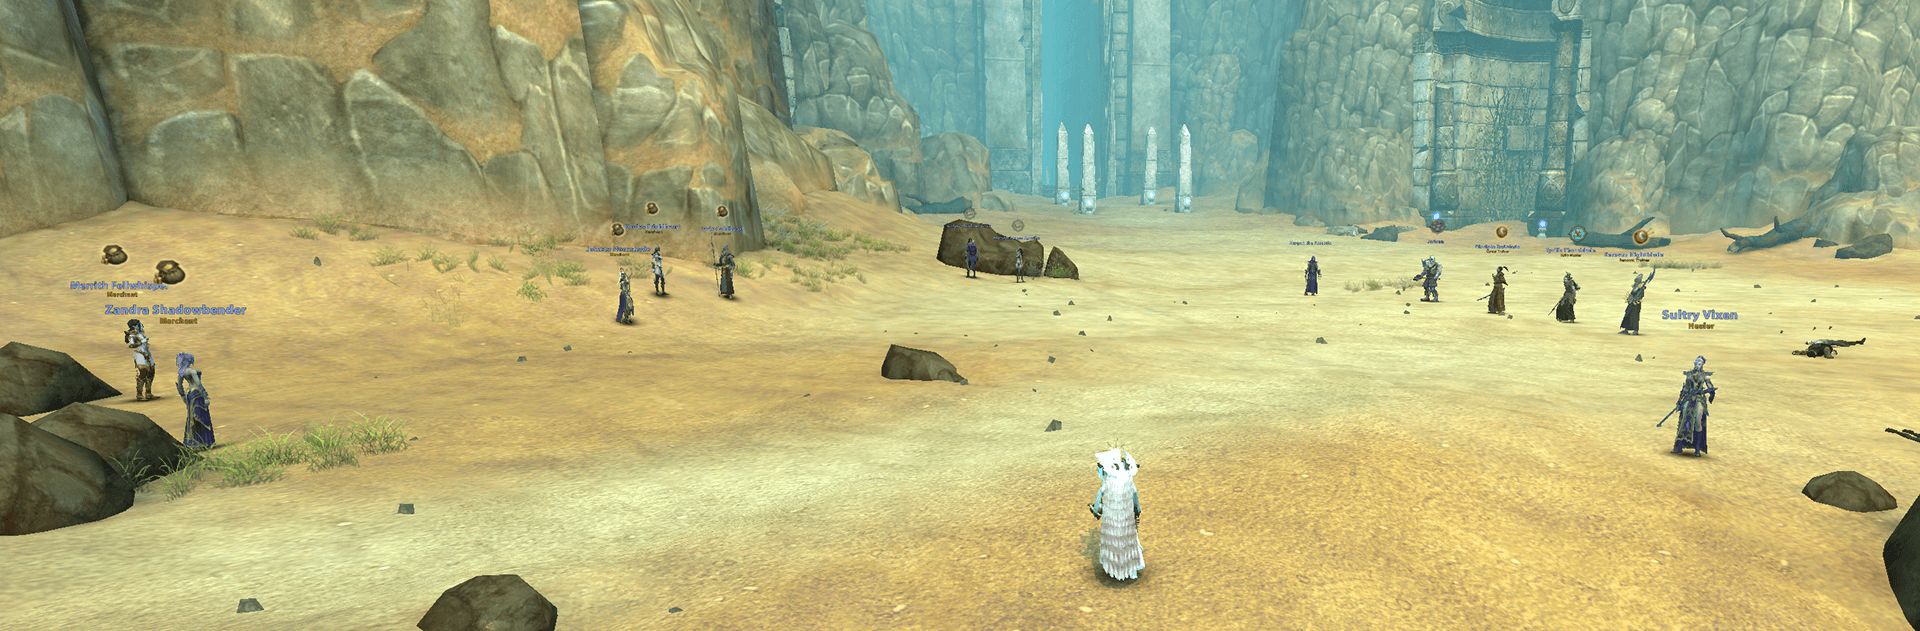
All the quests are inside the dungeon at the entrance including the merchant for the Rings and Weapons.
Hidden Quest
There is a slightly hidden quest for materials for the rings found on the east side of the beach just behind some rocks.


Core Concepts
Enrage Timer
Every boss has an Enrage Timer of 6 minutes. Once the time is up the boss enrages and wipes the group.
True Damage
Every boss deals an amount of damage that cannot be defended or reduced and can only be healed through. Make sure your wounds and armour are appropriate.
Group Composition
132
Generally recommend to form in the standard set up of 132, with 1 Tank, 3 dps and 2 heals as most bosses are easier with more dps to kill them quicker. 222 still works but the enrage timer and other mechanics may become an issue if both your dps are not that geared.
Tanks
SnB is recommended but you can be 2h if the rest of your spec and gear is good enough (recommended taking a RP/Zealot for the added protection and buffs).
DPS
1 dps needs to be AOE, a lot of bosses have ads, there are lots of mobs long the way and if you are clearing trash then this is a must.
1 dps needs to be ST for pure burst on bosses to make sure you don't take too long and hit important time/health checkpoints on bosses or ads.
1 dps should ideally be ranged, it makes the first boss much easier and some other mechanics are easier at range.
Healers
Zeal/RP is recommended for buffs, protection and ST heal (plus self res could be handy) but any pairing of healers should be fine. Two pure heal Doks/WP are not recommended due to the lack of strong ST healing and difficulty generating force/fury to heal with on some bosses.
Obviously there are so many combinations of parties and specs you could have and they could work great, this is just a suggestion.
1ST WING (LEFT)
Beginning
Click the main NPC between the quest givers to begin the dialog. It is quite long but if you follow the companion walking up the beach, he will be snatched by the Darkpromise beast, damage it quick enough to save the companion and get an unlock. It will then flee off to the left wing.
Ahzranok
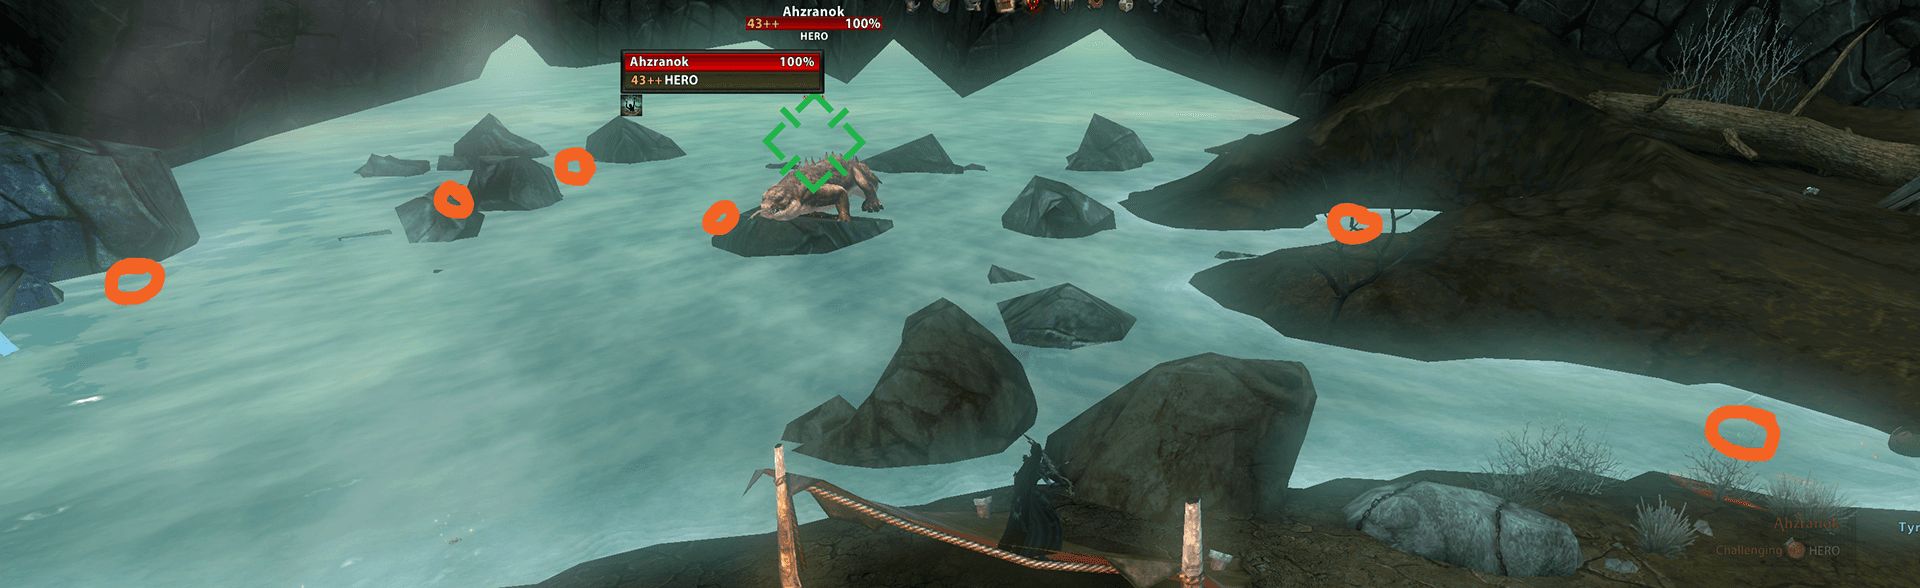
This Lizard boss is fairly straight forward but it is more difficult if you do not have a range DPS because of the water and having to swim. Tank him where he sits on the rock in the same direction.
Kill 6 eggs in the water every 20%
Every 20% of the boss's health eggs spawn at points throughout the water and always in the same place. After a short time, if they are not destroyed they will hatch additional mobs. Eggs are marked on the image above in orange.
If you destroy an egg then it increases your aggro from the boss. If 1 dps kills most of them then they will pull aggro from the tank. So ideally have healers destroy the two on the right side, a range on the far left, the tank kill the eggs next to the boss and the other two dps the ones behind.
Big Hits of true damage after eggs
Periodically heavy hits will occur and take 50% of the tanks HP with true damage. This mixed with a heal debuff on the target can cause problems if not careful so make sure the healers are not chasing eggs.
AOE Damage vortex (interrupt it)
Aqua vortex AOE damage near the boss occurs - this can and should be interrupted.
Additional Mob at 30% (ignore her)
Nearer the end, Lurquass, Ahzranok's mate, will spawn (sometimes she doesn't) and the tank should be able to pick this up while everyone else continues to focus the main boss, Ahzranok.
Malghor Greathorn

Writhing Musk (Pink clouds) that give you aggro and debuffs
Stepping in Musk will increase a player's aggro on the boss and debuff you. Each musk stepped in will increase damage taken by 5%, and reduce Block and Parry chance by 1%. These debuffs stack!!!
Moving Musks every 20%
Every 20% of the bosses health, more musks are spawned around the boss. These ones move toward random players but move slowly. So you need to kite this boss around the area. It is recommended to move quite far to one corner, stay there for a while then move again when the musks get near rather than constantly moving. The more you move the more likely someone will step in musks accidentally.
Target Swap
Malghor will periodically reset aggro and randomly pick a new target from the party. Tanks can step in musks to get aggro back.
The Darkpromise Beast

You can tank this boss where it is just make sure you kill the immediate mobs around it and nearer the cave.
Punts with aoe damage when landing
This boss will punt a nearby player directly up in the air. When they land they do quite large aoe damage but it should be manageable. Move away from a punted player if you need to.
Poison for 15 seconds that must be passed around the group
When the fight starts a player will be infected with a poison for 15 seconds which will be a beam of light. It damages every second and debuffs its target. You need to pass the infection to each player by standing near each other.
This is a DPS check boss. Each time you get the poison, it damages you more, if a player gets it 3 times, they will die from the damage. So you need to kill this boss fast and everyone can get the poison only TWICE.
Double Poison
Sometimes 2 poisons infect the group, unless you can kill the boss very fast after this happens, you will most likely wipe.
You do get an unlock for killing this boss with a dead team member.
Dralel the Whitefire Matron

Clear this area of all extra mobs. This spider boss is best tanked to the right hand corner up the wall with the healers lower down with their backs to the stone.
Punts and burn webbing (tank must free themselves first)
On the way to this boss you go through the spider cave and in the entrance to her lair there are Braziers that EVERYONE MUST click to get the Burn webbing ability. Every 20% health or so, everyone will be punted very fair and when they land, they will be stuck by webbing. Click this ability to free yourself and run back.
The Tank MUST free themself first as this gives boss aggro.
This is why that right corner is best to tank it because it is a little cover that you can aim yourself to get punted into the wall/pillars.
Parasites (stacking 5% damage buff to boss)
As soon as the fight starts, parasites will appear and run towards the boss. They are not aggressive and do not have much health but you must not allow many of them to reach the boss as each parasite gives 5% damage buff to the boss. Any aoe will work to kill them, even from healers (although it takes two hits), so it is best to have a AOE dps stand a bit lower down and kill the parasites in between dpsing the boss and the healers can assist with any aoe they have.
Warning - the terrain makes it quite difficult for getting ST on the parasites so AOE abilities are the only way to reliably kill them.
Erophex (Extra Boss) - Menhir Shards
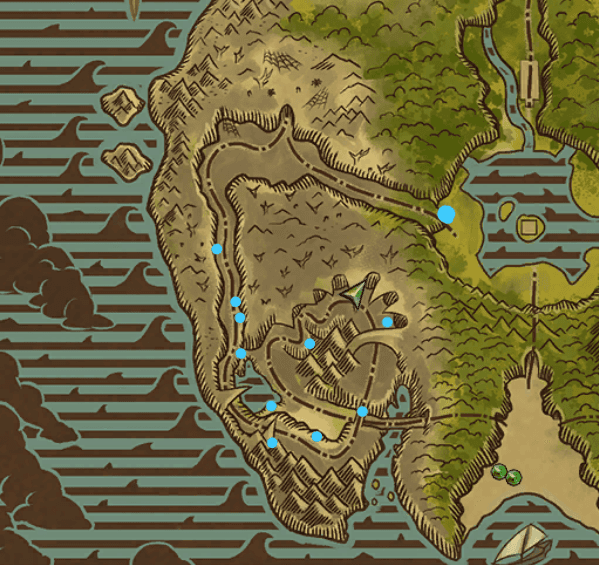
There are 10 Shards to collect to unlock the hidden boss Erophex. You just need to collect 10, multiple people can collect the shards. They have an 8 hour timer. Pick them up as you go through the wing.
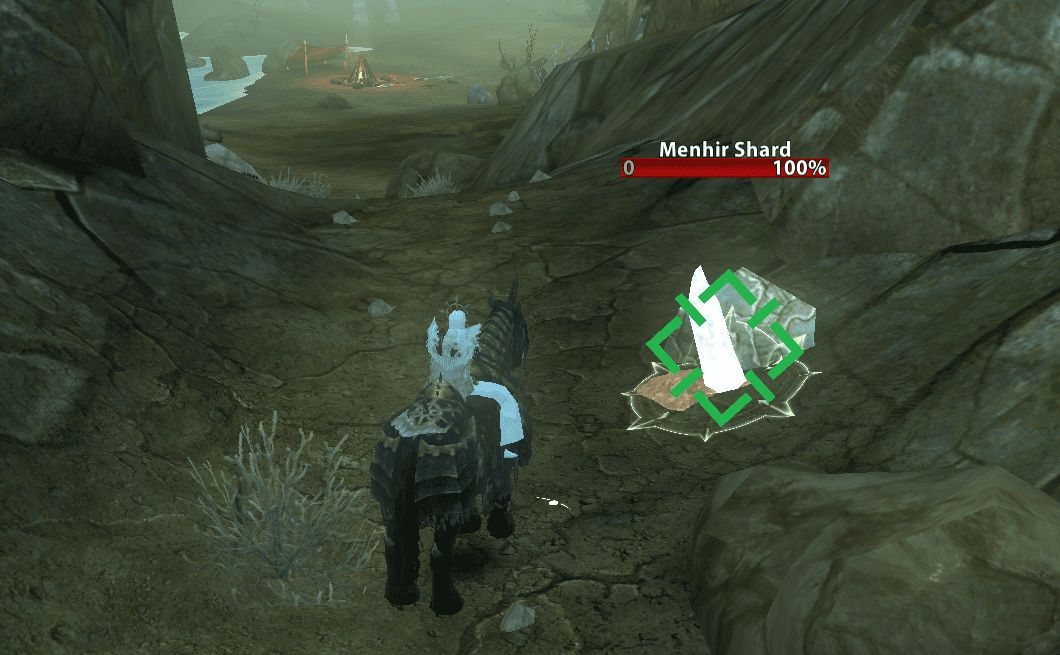


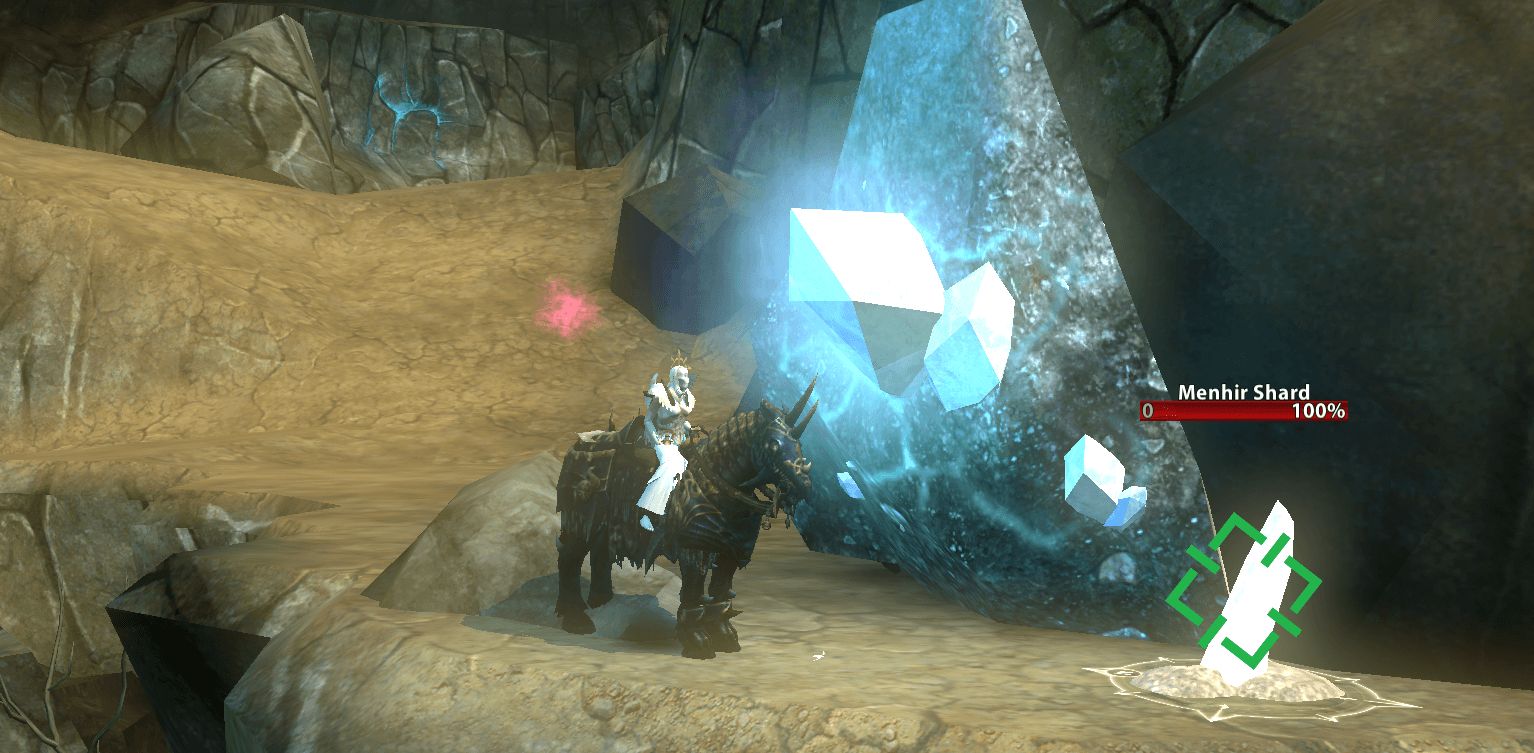

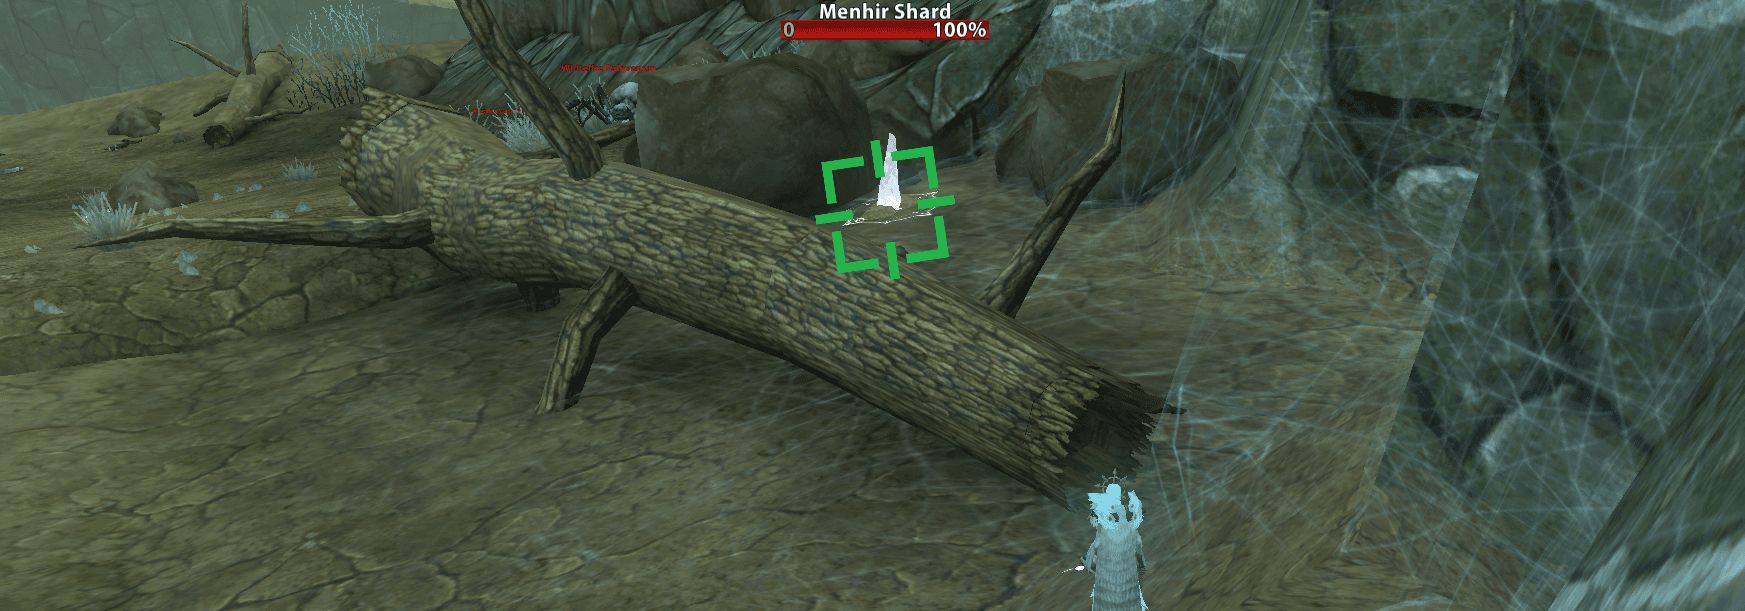


Click the shard to summon Erophex on the island below.


Gaean Vale Apples
There are two apples to collect to summon a boss, one from Left wing and one from Right wing. This is the left wing location:


2ND WING (RIGHT)
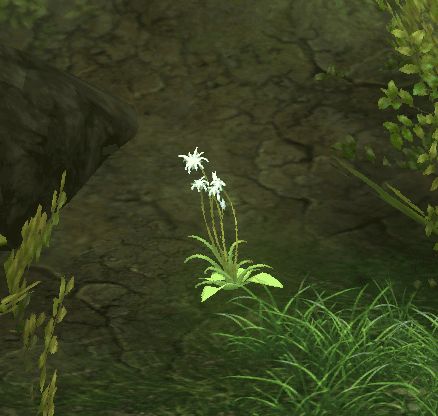
Darkpromise Blossoms
Throughout this wing there are long white flowers called Darkpromise Blossoms. When you click them you can get a buff or debuff for 60 seconds.
There is a rare 1% chance of granting a super buff or instant death! May the odds be ever in your favour.
Chul the EarthKeeper
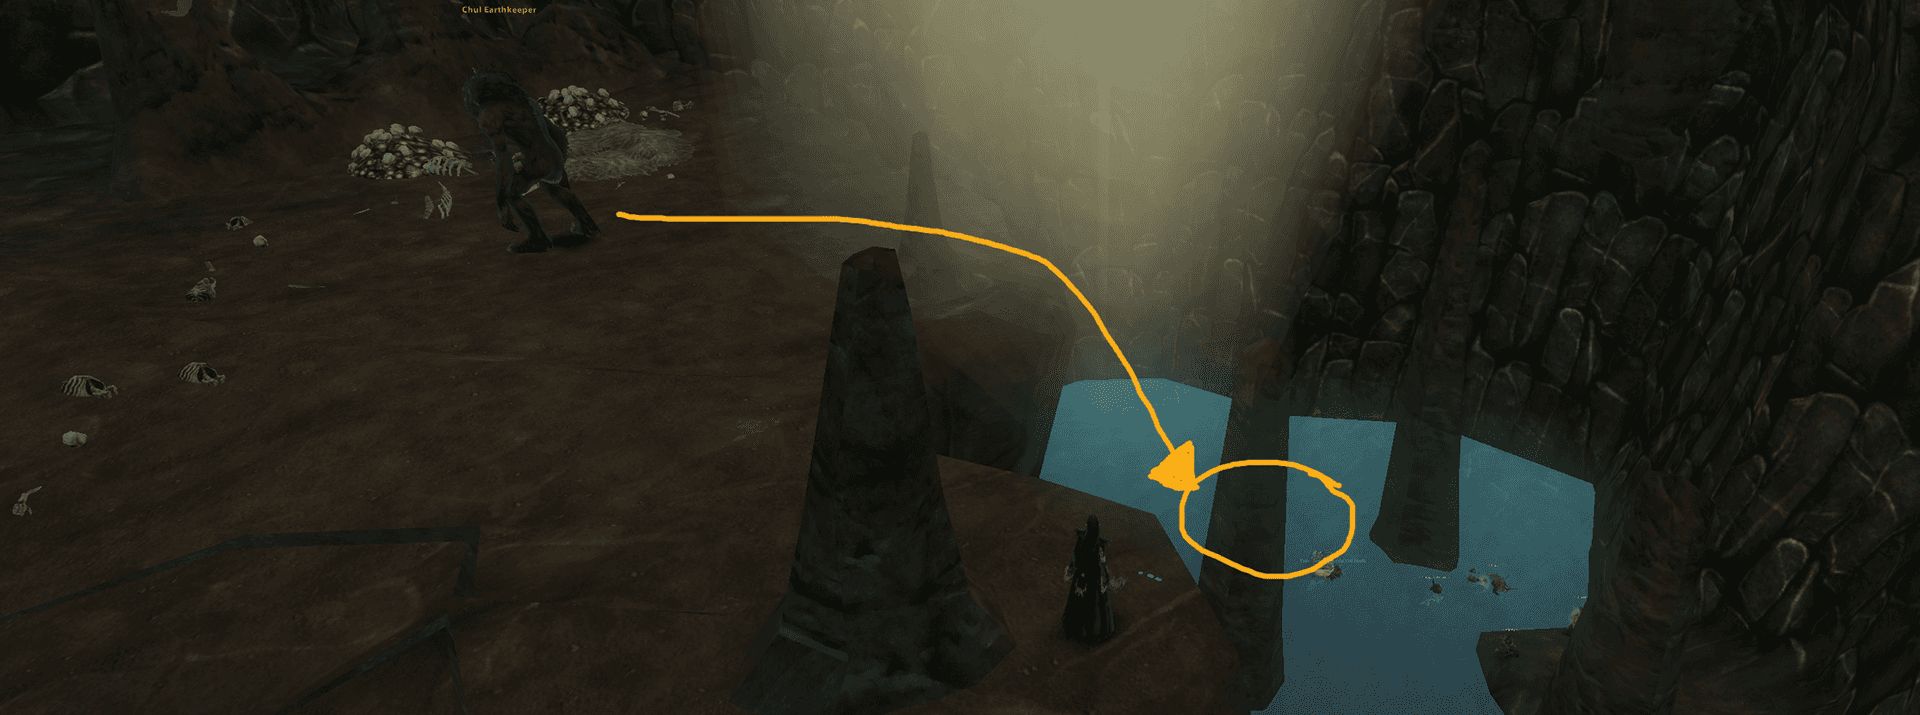
When you enter the cave, go to the right before pulling the boss and clear all the lizards down to the water. Then everyone should swim out into the middle of the water and wait. The tank should run up top, pull the boss and fall (not jump) off the edge into the water.
Aggro reset and punt every 10%
Every 10% of the bosses health, he will punt the highest aggro player, their aggro is reset and he will attack the next highest. Because you tank him in the water, the tank should be in guard distance of whoever has aggro.
True Damage on target
Chul does damage that cannot be reduced or defended against (including guard) so you must heal through it. However you can detaunt him for his auto-attacks. So pay attention to the aggro metre and prepare to heal squishier team members heavily.
Puddles
A red light will appear on a player and a few seconds later a puddle will appear that damages. Try to move it to the side of the water out of the way and avoid placing it where people are punted right in the centre. You can be punted and have a beam so sometimes it is unavoidable. They do despawn after a minute or so.
Larg the Devourer (Optional)

This boss is optional but grants 1000 influence so it is recommended to do it as he is on the way and not that hard, plus he drops Vale Gemstones. He is in a cave off of the water - follow the river from Chul then when it opens up into a large area of water, go to the right to find the cave entrance.
Punt
He will do an enraged charge, like the SH charge, that will knock back all players so it is recommended to tank him just behind where he stands in that cove so all the party stands together, see arrow in orange. This can be interrupted.
Shared Cleave
He will prepare a massive cleave (and warn you about it) which is a large amount of damage divided by the number of players it hits. So all the party should stand in front of him when you see this warning. It is easier just to stand there the whole time for most members.
Single Target Focus
He will warn that he is drooling at a player. The named player needs to then be guarded as he will do a very powerful attack shortly afterwards. This is not true damage and can be mitigated, blocked and detaunted.
When you are done you can skip some mobs/save some time by falling down the bridge, see arrow in blue.
Butcher Gutbeater

This boss has a couple of unique mechanics that require coordination.
Gnoblar damaging companion
A small gobbo spawns and does increasingly more damage unless you kill it (you can see a buff on him for X% damage). But, if you kill it then the boss gets 20% damage increase each time (this stacks). So you need to balance how much you kill it and when. A tank needs to keep aggro of this gobbo.
Ingredient Buffs (WIP)
Bacon (pig) = Reduced Cooldowns
Beef (cow) = Increased Run Speed
Doe (venison) = Never seen
Fish = Never seen
Fruit = Never seen
Greens = Increased Healing
Herbs = Damage Absorb
Horse = TBC
Onions = Increased AP Regeneration
Potatoes = Damage Decrease
Spices = Increase movement speed
Tomatoes = Never seen
(If you don't use a Horse or Beef you get an unlock title of Almost Vegan and a pet horse)
Kill Gnoblar after ingredient buff
Once you deliver the ingredient and get your buff, then kill the gobbo. The boss will get buffed and do a big hit of damage but you should survive it. A new gobbo will spawn from the larder area and you rinse repeat until the boss is dead (about 3 times).
Nectar - Collect for extra boss

Defeat a ring of branchwraiths at this location and a yellow Gaean Bloom flow appears, loot it to get the Nectar. This will be used to summon a hidden boss.


Gorak the Ancient

This boss is similar to the first main boss in BS left wing with lightening and you need to kite it around the area. Do not stack together or stay in one place, spread out wherever possible.
Damage buff (shatter it)
Every so often he will buff himself to increase his damage by 30% - strip this quickly.
Forward cleave
Tank should kite him around in a circle and everyone should stand to the back or slides of him.
Punt and lightning puddles and pulses (spread out)
At certain HP, he will punt nearby players away (not that far but make sure you don't get punted and reset him by mistake) and begin casting lightning.
Avoid the puddles on the ground and spread out while the pulses are happening on each player for less damage.
Additional mob at 50% (keep away from boss)
A Manticore appears that gives Gorak a 50% damage buff when they are together (there will be a red beam on the manticore when the buff is active). You can either power through and ignore the manticore (recommended), or have an off-tank or high-HP player take him off to the side if you are struggling with the damage.
You may also be able to reset him to the middle with a pet (this may have been fixed now). Have a pet be the nearest to the stone platform, when the manticore appears, let him attack the pet and kill it and make sure no one else attacks it. when the pet dies, he should reset in the middle of the stone platform and you can keep Gorak away from him for the rest of the fight.
Sarthain the Worldbearer

This boss has a couple of unique mechanics that require coordination. Before you start, run around the area and kill all the creatures of the value near the dormant corruptors - this greatly helps in the healing phases.
Then decide which dps will go to kill each corruptor in the healing phase, ideally 1 dps per corruptor.
True Damage
He will hit his target for a large chunk of their total health. This has a long cooldown but be mindful that it does not stack with the other mechanics as it will be very difficult to survive all of them at the same time.
Forward Cleave every 15s
Every 15 seconds or so he will do a cleave. Always prepare for this cleave as it compounds the other mechanics.
Every 10% health, he will do the Heartwood cleave which is a shared cleave that is divided by the amount of players it hits. ALL PLAYERS SHOULD MOVE TO THE TANK when this happens. It is possible for 1 or 2 to remain behind the boss if your party is geared enough or certain members are struggling to survive this hit. It is often easier for people to just stack on the tank the whole time rather than accidentally miss the cleave an cause a wipe.
If this cleave hits a single player, they will almost always die.
Healing Phase - kill the 3 Corruptors to the north, east and south
At 75%, 50% and 25% the boss will enter this healing phase - pop a heal debuff on the boss to help.
Sapping vitality - the boss will spawn roots to hit players who are on the island or near it which increases all incoming damage on the player by 5% for some seconds and it stacks.
Healing from the corruptors - they will be channelling health to him so each of your dps need to immediately go to damage them and break their channel. As soon as all corruptors are interrupted, the healing phase will end.
Creatures of the vale - if all players leave the island more creatures will be called to attack you. This may be preferable over the stacking damage buff or your tank may be able to remain on the island to protect the dps going after the corruptors. The creatures can overwhelm you, so choose wisely each phase.
Hard Mode - Ignore the Corruptors
This is to ignore the corruptors entirely and power through the damage stacks (damage increase DOES apply to the cleaves)
Extra Boss
Assuming you have collected the nectar. After or before you defeat the last boss of the right wing, go to the south near the waterfall and find an Aged Root. Click it and the hidden boss will be summoned. He does hit hard, summon lots of ads and punt you up in the air (landing gives aoe damage) so detaunt in the air, move away from people punted and AOE down the ads or you will be overwhelmed.


3RD WING (MIDDLE)
Zaar the Painseeker

A fairly straightforward boss but your group can be unfortunate in the last phase so make sure you prepare.
Forward Cleave
The boss has a moderate forward cleave, do just make sure he is faced away from the rest of the group.
Cages
There are 4 cages in the room, at each 20% health 1 random person will be put in the cage and disabled. The next time 2 people, then 3 and finally at 20% 4 people will be put in the cage. Tanks will always be caged last by design but if you have dead members then this is a possibility.
If you are unlucky, the last caging will be all your dps and you will have ads remaining. In which case the tank and remaining healer MUST free a DPS. The DPS should free the other healer and then the other two dps. When the boss is at 22% throw defensive morals to help survive.
Ads (kill them before the next cage phase)
After the cages, some ads will appear from the entrance and run to the boss and power him. Kill them asap because later on when more people are caged, it can cause wipes if there are still ads.
Horgulul

This boss can be very overwhelming with ads and punts so positioning is everything. You can skip some mobs by swimming to the stairs and tank her to the right of the stairs that are just behind her. Tank to the tree trunk, everyone else with their back towards the stairs wall - see image.
Huge Damaging Punts (75%, 50%, 10%)
At 75% health, 50% health and 10% health she will do a massive punt (like SH punt) which will fling you across the map if you do not have your back to something and cause a big hit of damage. Detaunt or m1 just before this punt if you are struggling with the damage.
Lots of ads (AOE needed)
There will be increasing amounts of ads that appear as you progress. Keep on top of the ads (AOE them) until after the 2nd punt at 50%, then try to ST her down quickly. Make sure to save your crowd-control for her last 10-20% health if you have a lot of ads to knock them down.
If you have positioned as mentioned above then all the ads should be nicely grouped together and easy to pull off healers or any one else who gets aggro.
There will be big maggots/slugs that spawn after 50%. Kill them to reduce buffs to the boss or leave them to enter Hard Mode.
Sechar the Darkpromise Chieftain
This boss has very specific needs... everyone needs to react fast. Make sure to clear all mobs in the area before you begin including the ones beside him.
Tank him at the bottom of the stairs with the tanks back to the stairs.
Pleasure and Pain modes - 90% pleasure, 70% pain, 50% pleasure, 30% pain, 10% pleasure
Throughout the fight after the first 10% health he will be in one of two modes: Pleasure or Pain. Both cause constant channelling damage to your party.
Pleasure - GO CLOSE - he will shout that he is in pleasure and a thick beam of light will connect each player to him (like sorcs hand of ruin). You MUST GO CLOSE to him. Stack as close to him as possible to reduce the damage from the channel. He occasionally does channelled punts that can be interrupted in this mode.
Pain - SPEAD OUT - he will shout he is in pain and a thin grey line will connect each player to him. You MUST SPREAD OUT away from him and other players. The tank has to remain close, but melee dps should spread out as much as possible while in range to dps him.
Stones at 60%
At around 60% health, 2 stones appear up on the platform he was standing on originally and debuff you 40% damage AND healing. You can destroy one (but NOT both or he enrages) to remove one debuff for the rest of the fight. It starts at 30% debuff and increases to 40%.
Destroying the LEFT stone means your party will still have 40% DAMAGE DEBUFF
Destroying the RIGHT stone means your party will still have 40% HEAL DEBUFF
You will most likely want to destroy the RIGHT stone. This can be tougher without a zealot/rp in the party. Save your morals for the transitions at 50%, 30% and 10% because you will be heal debuffed and struggling more.
Ads - AOE them
Ads will constantly spawn from the stop platform and run down and heal the boss. This is why you tank him at the bottom so that the tank can get the ads aggro first and if the punt happens it is up the stairs. You need to keep on top of killing the ads, as too many healing him and with a group heal debuff later, it will be a big problem.
N'Kari, Keeper of Secrets

This is the final main boss and has several mechanics.
Kill mobs to get the tablets and start the fight
There are some mobs floating, you need to kill them and they drop these stone tablets. 3 people take the tablets and get an ability to interrupt the channel. Decide on an order of who should click their ability as this needs to happen 3 times and the ability has a cooldown.
180 Cleave
The boss has a 180 heavy cleave so you need to angle her with this in mind. It is also recommended to tank her to the back left and back right of the room (either side of the pool) so you can control the cleave and avoid orbs. If the tank stands to one side and everyone else to the other then you can avoid the big initial cleave.
Puddles - Purple (ap drain) Green (damaging)
Frequently 1 - 2 players will get a red pillar of light on them, this means they will spawn a puddle in about 5 seconds. Try to run away from anyone else and place the puddle somewhere out of the way. Avoid blocking the stairs or path ways to collecting orbs.
Purple Puddles = drains ap
Green Puddles = damages
Punts with AOE damage when you land
Similar to other bosses you can get punted directly up in the air. When you land you will cause AOE damage. If you detaunt the boss in the air this can reduce the damage when you land.
Damaging Channel and Orb Buffs
Every 25% of her health she will stand still and start channelling this lightening. It will damage the whole party every second so 1 healer must be roughly centre of the room and keep healing.
Orbs will appear at the entrance (DO NOT stand here or you will accidentally take an orb) and zoom to different places and give different buffs. The most important orb is the Gold orb and the tank MUST take this orb to survive the boss's damage when you cut the channel.
DO NOT chase after red or blue orbs too much - you CANNOT catch up to them even if you flee. The constant damage from the channelling means you can run out of range and LoS of your healers who will be under a lot of pressure and not able to chase you to heal.
When your tank has the Gold Orb, have the 1st person click their ability and interrupt the channel. She will immediately go after the person with the most aggro, hopefully the tank, but they may have had to run to chase the gold orb so be careful of cleave and position her again. Rinse repeat 3 times.
Orbs:
1 Blue Orb = Healing Buff
2 Red Orbs = Damage Buff
1 Gold Orb = Health Buff
Orbs:
At the entrance
By the Conduit in the pool at the back
Up the stairs to the right and towards the entrance
Up the stairs to the left and towards the entrance
Kill Ads Spawning after channel ASAP
When you interrupt the channel, a couple of ads will spawn at the entrance. You MUST kill them ASAP.
Conduit powering up the boss
There is a conduit at the back of the room which builds up with power and then empowers the boss. 1 person can click it to dispel the power, but they also get a temporary debuff that stops them from gaining moral. You don't have to click this but it does help if your group is struggling with damage.
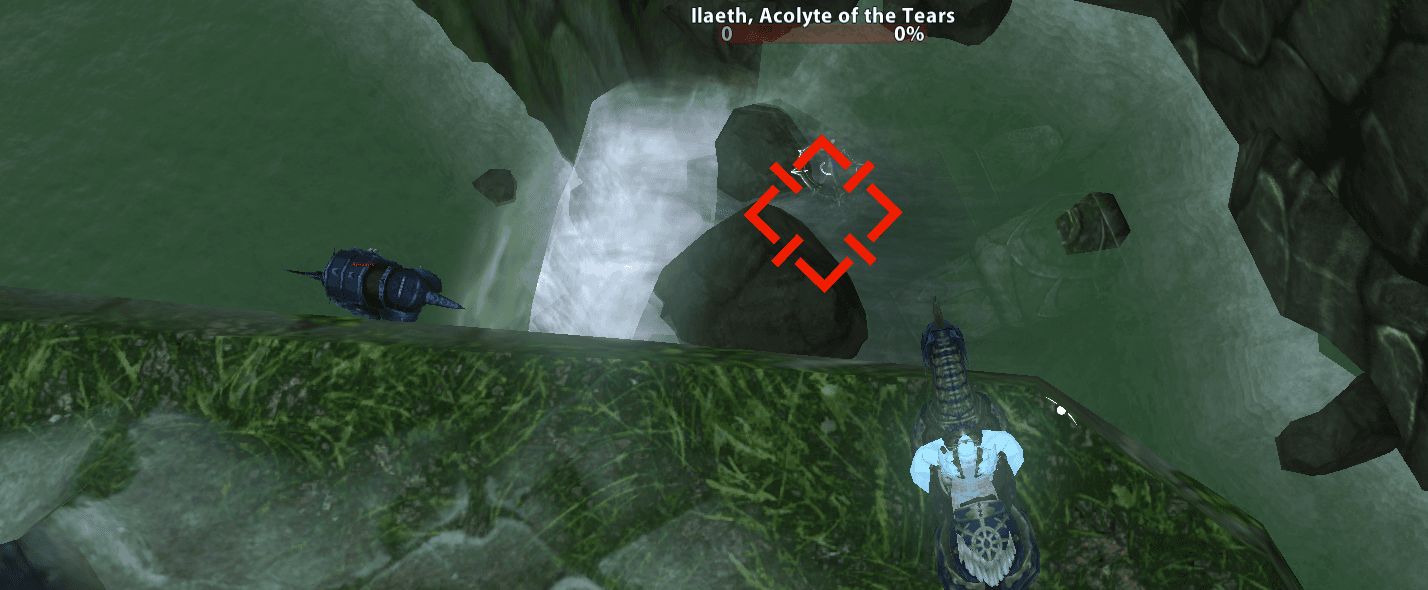
Fallen Sister & Ilaeth Acolyte of the Tears - Seraxes (Extra boss)
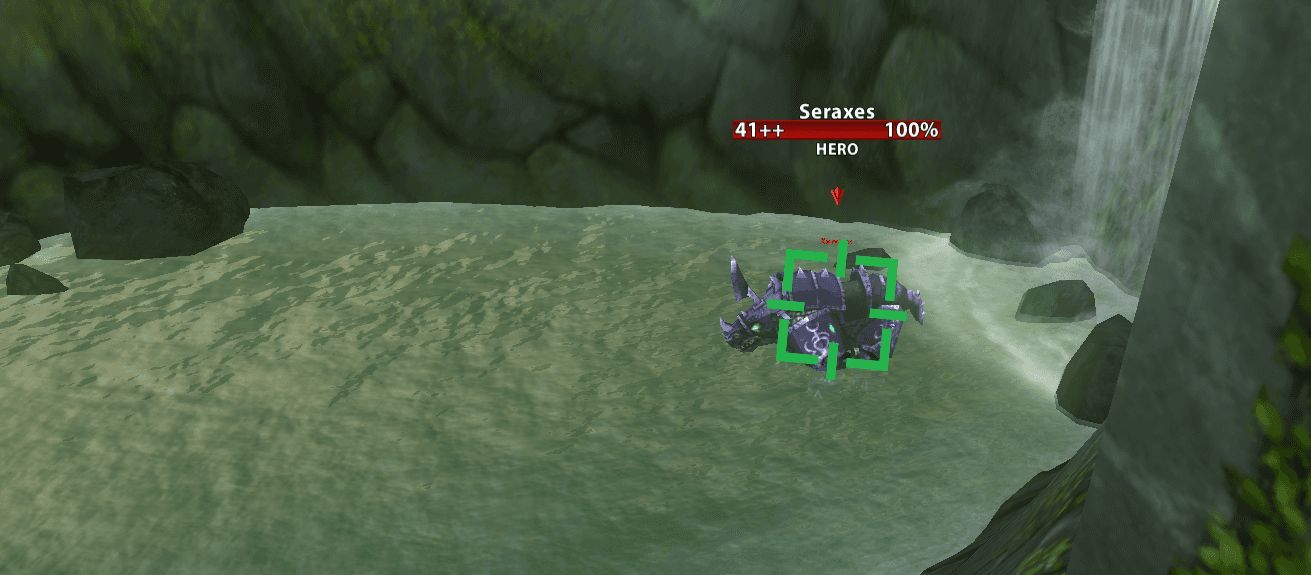
Find two corpses to summon the hidden boss Seraxes. The first is at the start of the middle wing. Go up the stairs then jump down into the waterfall and click the corpse.
The next is near the end of the middle wing. Jump down to the waterfall and click the corpse then the boss will appear directly below.
This boss hits HARD, he has the punt mechanic, the musk mechanic (with aggro swap) and a cleave. It is recommended that you first defeat Sechar the Darkpromise Chieftain so that portal is up.

Extra Final Boss
Syndestra

Each time you killed an extra boss, a pylon appears in the middle of lost value. If you raise all 5 then Syndestra will appear.
She will go through phases and use the mechanics of each extra boss you have killed. This is the toughest PVE fight in RoR and the reward is a +wounds ring.
Special thanks to @Dsparil for personally showing me some of the hidden items and mechanics and @MightyPhred for other hidden boss tips